A vacuum that doesn’t roll properly can make cleaning frustrating and exhausting. Sticky wheels, jammed brush rolls, or excessive friction can turn a simple chore into a struggle. Beyond inconvenience, poor rolling can strain the motor, reduce efficiency, and even shorten your vacuum’s lifespan. Many people overlook basic maintenance steps that prevent these issues.
In this guide, I’ll explore the most common reasons vacuums fail to glide smoothly, provide practical troubleshooting steps, maintenance tips, and cost-saving advice. By understanding why your vacuum isn’t rolling properly, you can restore smooth operation, improve cleaning performance, and avoid costly repairs or replacements.
Common Reasons a Vacuum Won’t Roll Properly
Before diving into solutions, it’s important to understand the main causes. A vacuum may resist movement due to debris buildup, worn components, brush roll issues, or incorrect settings. Each of these factors can be addressed with proper inspection and maintenance.
Debris Caught in Wheels or Brush Rolls
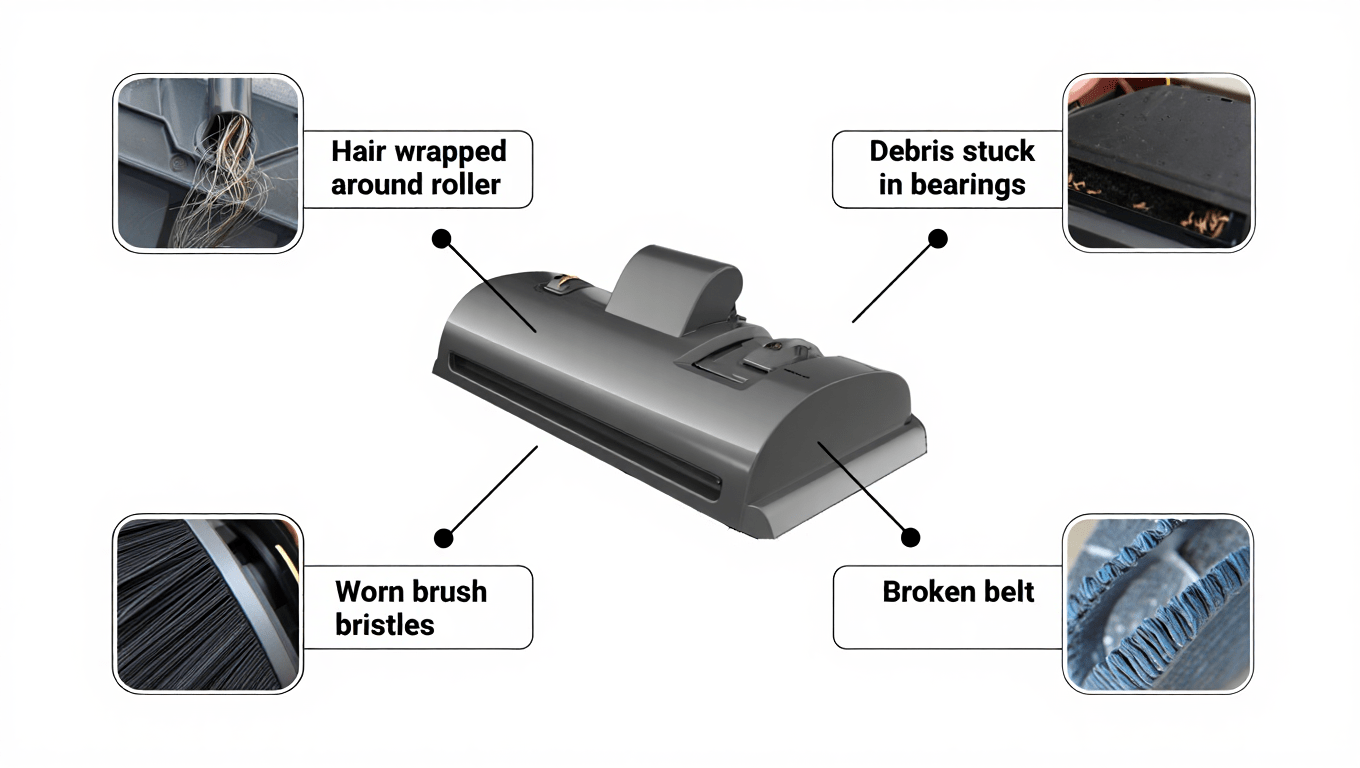
One of the most common reasons vacuums don’t roll smoothly is debris caught in the wheels or brush rolls. Hair, threads, carpet fibers, and small objects can wrap around the brush or lodge inside wheel mechanisms. Over time, this creates friction that makes pushing the vacuum difficult.
Real-World Example:
A family using a high-pile carpet vacuum found it increasingly hard to maneuver. Upon inspection, a tangle of hair and rug fibers had wrapped around both the brush roll and the rear wheels. Removing the debris allowed the vacuum to roll smoothly again, restoring normal cleaning performance.
Maintenance Tips:
- Inspect wheels and brush rolls at least once a month, especially in households with pets.
- Use scissors or a specialized brush to remove tangled hair carefully.
- Consider vacuums with tangle-free brush rolls if hair buildup is frequent.
Cost-Saving Advice:
Regular debris removal prevents motor strain and avoids the need for expensive belt or motor replacements. DIY cleaning of wheels and brush rolls costs nothing but time and extends vacuum lifespan.
Worn or Damaged Wheels
Vacuum wheels can wear down, crack, or flatten over time, especially on rough floors or during heavy use. Uneven or damaged wheels create resistance and may cause the vacuum to veer to one side.
Real-World Example:
A stick vacuum used daily on hardwood floors began veering to the left and feeling “stuck” on certain surfaces. Upon inspection, the front wheel had flattened slightly from wear. Replacing the OEM wheel restored smooth, even rolling.
Maintenance and Replacement Tips:
- Inspect wheels regularly for cracks, deformation, or signs of wear.
- Replace worn wheels with OEM parts to ensure proper fit and durability.
- Avoid cheap aftermarket wheels; they may wear faster or damage flooring.
Practical Tip:
Lubricating wheel axles with a small amount of silicone-based lubricant can also improve rolling and prevent squeaking.
Brush Roll Issues
Many vacuums rely on the brush roll to help glide over carpets. If the brush roll is jammed, tangled, or spinning incorrectly, the vacuum may resist movement. This is common in homes with pets, children, or high foot traffic.
Real-World Example:
A high-pile carpet vacuum suddenly became very hard to push. The homeowner found hair and threads tightly wound around the brush roll. Cleaning the brush and replacing a slightly worn belt restored smooth operation.
Maintenance Tips:
- Remove the brush roll monthly to clean hair, fibers, and threads.
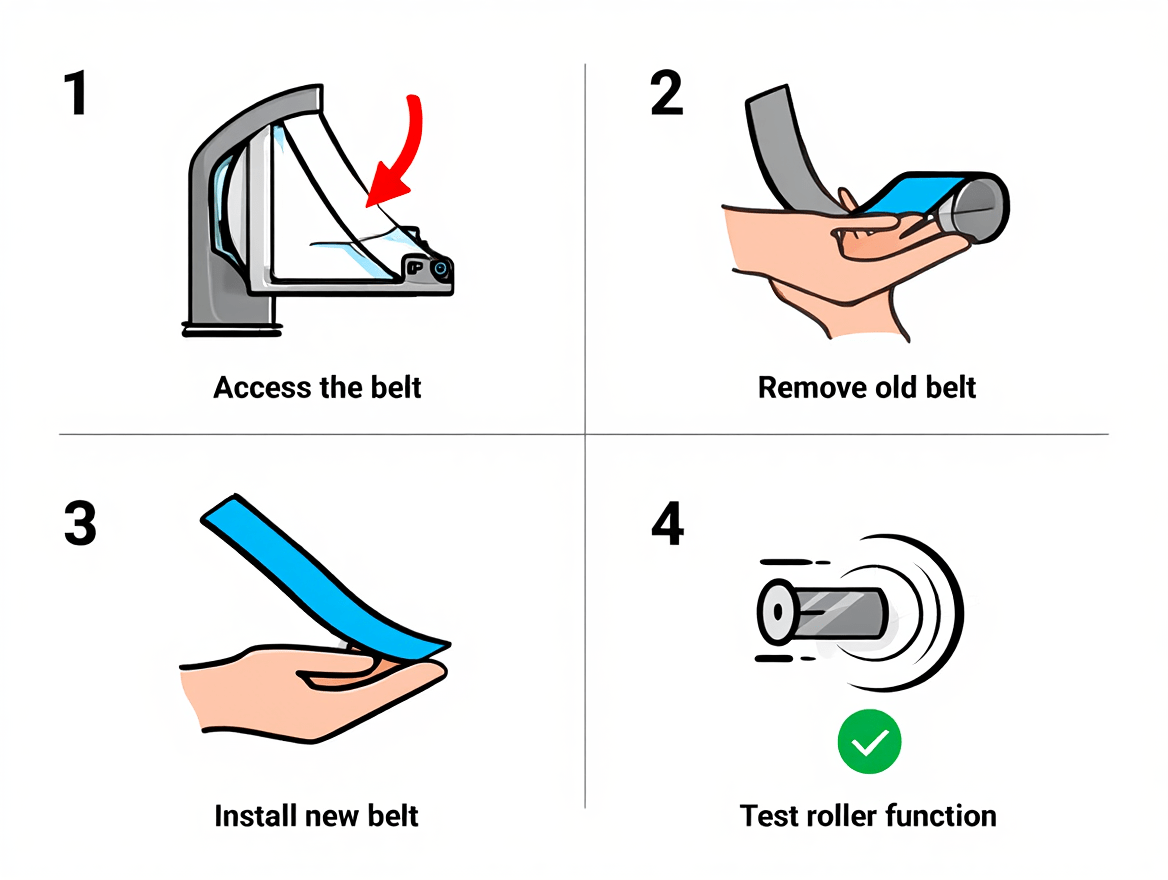
- Check the belt for cracks or stretching; replace OEM belts as needed.
- Lubricate rotating components if recommended in the manufacturer’s instructions.
Cost-Saving Advice:
Routine maintenance prevents strain on the motor, avoiding costly repairs. Replacing a brush roll belt ($10–$25 OEM) is far cheaper than motor replacement ($150–$200).
Improper Height or Suction Settings
Incorrect brush roll height or suction can make a vacuum difficult to push, especially on thick carpets. Too-low height increases friction, while too-high suction can “stick” the vacuum to the carpet.
Real-World Example:
A homeowner struggled to push their vacuum over a plush area rug. Adjusting the brush height to match the carpet and slightly reducing suction allowed the vacuum to glide easily.
Practical Tips:
- Always set brush height according to flooring type.
- Adjust suction to prevent motor strain and improve maneuverability.
- Consult the user manual for recommended settings for carpet, rugs, and hard floors.
Cost-Saving Tip:
Proper settings reduce wear on wheels, brush rolls, and belts, preventing unnecessary replacements.
Advanced Troubleshooting
If your vacuum is still difficult to push after cleaning wheels and brush rolls, it’s time to explore more advanced causes. These often involve mechanical components or alignment issues that require careful inspection.
Check Wheel Alignment and Axles
Sometimes wheels become misaligned or axles bend from repeated impacts or rough handling. Misaligned wheels create drag and uneven movement.
Real-World Example:
A homeowner noticed their upright vacuum veering to the right. Inspection revealed a bent rear axle. Carefully straightening the axle restored smooth movement.
Maintenance Advice:
- Inspect wheel axles for bends or damage.
- Ensure wheels rotate freely without wobbling.
- Replace OEM axles if damaged; aftermarket parts may not fit precisely.
Cost-Saving Tip:
Addressing axle issues early prevents additional strain on the motor and brush roll, avoiding more expensive repairs.
Check for Motor or Brush Roll Resistance
If the brush roll or motor is struggling, it can make the vacuum hard to push. Over time, motors may wear, belts stretch, or brush rolls become misaligned, increasing friction.
Example:
A high-end upright vacuum felt unusually heavy on carpets. After removing the brush roll, the homeowner found the belt slightly frayed and slipping. Replacing the belt and cleaning the brush roll solved the problem.
Practical Tips:
- Inspect belts regularly and replace with OEM parts.
- Make sure brush rolls spin freely without resistance.
- Lubricate rotating components if recommended by the manufacturer.
Cost-Saving Tip:
Regular belt and brush roll maintenance prevents motor overwork, extending vacuum life and saving on expensive motor repairs.
Inspect the Surface
Sometimes the problem isn’t the vacuum itself. Thick rugs, high-pile carpets, or uneven flooring can create rolling resistance.
Example:
A homeowner struggled with a stick vacuum on a deep shag rug. Switching to a lower brush height and vacuuming in multiple directions reduced resistance and made movement easier.
Advice:
- Adjust settings according to flooring type.
- Consider pre-vacuuming high-pile areas with a lightweight handheld or corded stick vacuum.
- For uneven floors, inspect and repair bumps or warping that may impede rolling.
Preventive Maintenance to Keep Your Vacuum Rolling
Regular maintenance not only ensures smooth movement but also extends the life of your vacuum.
Wheel and Brush Roll Cleaning
- Remove hair, threads, and debris from brush rolls and wheels monthly.
- Inspect and tighten any loose wheel screws.
- Replace worn wheels or brush rolls with OEM parts for optimal performance.
Proper Storage and Handling
- Avoid dropping the vacuum or using it on surfaces that can damage wheels.
- Store upright vacuums on flat surfaces to prevent axle bending.
- Use protective covers for brush rolls if storing for long periods.
Lubrication
- Apply manufacturer-approved lubricants to wheel axles and rotating components as needed.
- Avoid over-lubrication; excess oil can attract dirt and cause friction.
When to Replace Wheels, Brush Rolls, or Vacuums?
Even with maintenance, some components or vacuums may need replacement:
Signs You Need Replacement:
- Wheels cracked, flattened, or wobbling beyond repair
- Brush rolls failing to spin or fraying repeatedly
- Excessive effort required to push vacuum despite cleaning
- Frequent motor strain caused by friction
Example:
A family’s upright vacuum wheels cracked after 5 years of heavy use. Replacing the OEM wheels restored performance at $20 per wheel. Attempting cheap aftermarket wheels caused uneven rolling and floor scratches.
Cost-Saving Tip:
- OEM wheels and brush rolls may cost more upfront but save money on motor repairs and avoid damaging flooring.
- Consider replacing the entire vacuum only if multiple components fail or the unit is very old.
Final Takeaway
A vacuum that doesn’t roll properly is frustrating but usually fixable with proper inspection and maintenance. Check for debris in wheels and brush rolls, inspect for wear or damage, adjust height and suction, and maintain belts and axles. OEM replacements ensure reliability and prevent motor strain. Preventive maintenance—including monthly cleaning, lubrication, and careful storage—keeps your vacuum gliding smoothly and prolongs its life.
If components are irreparably worn, replace wheels, brush rolls, or the vacuum itself. By understanding these causes and solutions, you can restore smooth rolling, reduce cleaning effort, and protect your investment in a long-lasting, high-performing vacuum.
FAQs
Why is my vacuum hard to push on carpet?
Most often due to tangled brush rolls, debris in wheels, or incorrect brush height. Inspect and clean components, adjust settings, and check belts.
Can worn wheels damage my vacuum?
Yes. Worn or cracked wheels create friction, strain the motor, and can cause uneven wear on the brush roll. OEM replacements are recommended.
How often should I clean wheels and brush rolls?
Monthly cleaning is ideal, more often in households with pets or high foot traffic. Regular maintenance prevents friction and motor strain.
Will adjusting brush roll height help?
Yes. Correct height reduces friction, improves maneuverability, and prevents excessive motor effort. Always follow manufacturer guidelines.
Can surface type affect rolling?
Yes. Thick rugs, high-pile carpets, or uneven flooring increase resistance. Adjust settings or pre-vacuum with a lighter model to ease movement.
Are aftermarket wheels a good option?
OEM wheels are preferable. Cheap aftermarket options may not fit correctly, wear faster, or damage floors.
How do I know if the brush roll belt needs replacement?
Signs include slippage, visible wear, fraying, or brush roll resistance. Replacing the belt with OEM parts restores smooth operation.

